SinterPixels Demos, Part 12: Hexagonal Tiling
Next in the series of what’s possible with SinterPixels, my new app in the macOS App Store: How to generate this hexagonal tiling:
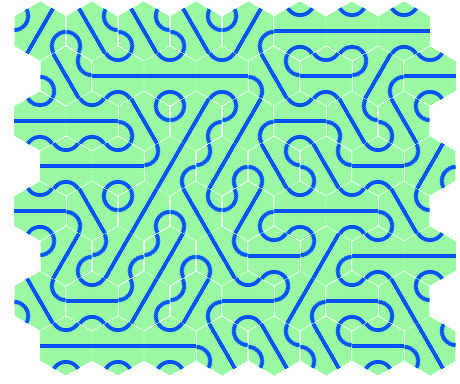
Previously, In Part 10, I showed how to make a square tiling. A square tiling is a bit easier than a hexagonal tiling, because the tiles are square, and layers are also square, so one can make a layer entirely filled with the tile. For a hexagonal tile, we have to leave part of the rectangular tile transparent, so it looks like a hexagon. That’s accomplished using the blend mode.
When using the blend mode sourceIn to create a shape, if the shape is drawn over something transparent, it doesn’t show up. So, starting with a transparent tile, first we draw a hexagon filled with an opaque color, and then we draw shapes over it using the sourceIn blend mode. This means only the parts of the shape that overlap the hexagon will be visible.
The two other differences from the square tiling script are: first – the placement of the hexagons – Instead of a square lattice, every other line is offset by ½ x, and the spacing in x is approximately 0.866 times the spacing in y (that’s one half of the square root of 3 ) and second – there are now three possible rotations for the tiles instead of 2.
tell application "SinterPixels"
set tileDoc to make new document with properties {name:"Tile", height:60, width:60}
tell tileDoc
make new polygon with properties {position:{0, 0}, vertex count:6, radius:30, rotation:0, line width:0, closed:false, fill color:{0.5, 1.0, 0.5, 1.0}}
make new circle with properties {position:{30, 0}, radius:14.1, color:blue, fill color:{0.5, 1.0, 0.5, 1.0}, line width:4, blend mode:sourceIn}
make new circle with properties {position:{-30, 0}, radius:14.1, color:blue, fill color:{0.5, 1.0, 0.5, 1.0}, line width:4, blend mode:sourceIn}
make new polygon with properties {vertex:{{0, -30}, {0, 30}}, position:{0, 0}, line width:4, closed:false, color:blue, fill color:clear, blend mode:sourceIn}
set tilePNG to get PNG data
end tell
set mosaicDoc to make new document with properties {name:"Mosaic", height:384, width:460}
repeat with x from 1 to 8
repeat with y from 1 to 4
set newPosition to {(x * 52) - 241, ((2 * y) * 45) - 250}
set newRotation to some item of {30, 90, 150}
tell mosaicDoc
set nthLayer to make new layer with properties {image data:tilePNG, rotation:newRotation, position:newPosition}
end tell
set newPosition to {(x * 52) - 215, (((2 * y) + 1) * 45) - 250}
set newRotation to some item of {30, 90, 150}
tell mosaicDoc
set nthLayer to make new layer with properties {image data:tilePNG, rotation:newRotation, position:newPosition}
end tell
end repeat
end repeat
end tell